

how to add a neutral wire to an existing light switch
Wiring in Wall Lights – How to Wire in a New Wall Light and Light Switch
A How to tutorial on adding a wall light and light switch to an existing circuits. This project focuses on wall lights but the same circuitry and wiring can be used to add new ceiling lights to your lighting circuit in any room or hallway in the house. There is also information on the wiring regulations you need to comply with while doing any electrical work in your home. Essentially, this project will show you how to add additional lights and switches to existing circuits.
Please remember, when attempting any form of electrical installations at home that you are obliged to get the completed job tested by a fully qualified electrician and obtain a minor works certificate. Failure to do this may render your house insurance invalid and you may have difficulty selling your home.
Warning: To complete electrical works you must comply with Electrical Regulations – Click here for more information.
Please see our project on Part P Building Regulations for information on DIY electrical installations. Please also see our project on the New Wiring and Cable Colours for information on how cable colours have changed in accordance to the regulations.
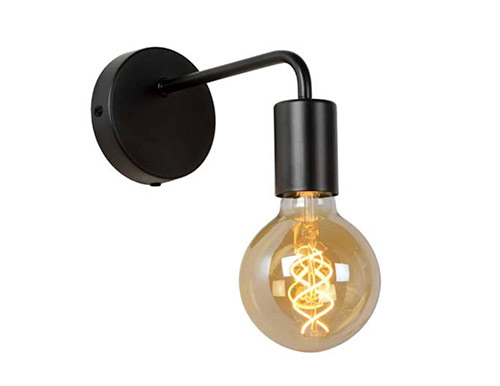
Wall light
Advantages of Adding a Wall Light
Adding a wall light to a room can have a number of advantages. The light can be switched independently of the main lights in the room which means it can serve as a night light above the bed, a reading light in the bedroom, a hall light which can be operated from somewhere other than the hall, an outside light, operated from indoors, a reading light in the lounge or, more commonly, a picture light in the lounge and dining room.
Often, adding an independently switched light is far cheaper and much less messy that turning a one way lighting point into a two way switched point.
Our project shows 2 wall lights added, but the same circuit can be used for an additional ceiling light switched independently.
Tools You will Need:
- Flat blade electrical screwdrivers
- Electricians side cutters
- Wire stripers
- Electric combination drill
- Screwdriver bits
- Masonry Bits
- Small boat torpedo level for switch face plates
- Claw hammer
- Junior Hack saw
- Hobby knife
Materials you will Need
- 1 x 20 amp junction box (3 terminal)
- 1 x 20amp junction box (4 terminal)
- 1 x 1 way switch
- 1 x single pattress box with grommet
- 1.5mm cable to suit
- Earth sleeve
- Red tape
- Cable clips
- Screws
- Wall conduit for 1.5mm cable
- We have used 20amp junction boxes to allow more room
A Word About Choosing Light Bulbs
When it comes to bulbs, you might also like to see our projects on why do my light bulbs keep blowing and facts about replacing LED bulb
Light bulbs, while often seen as a simple commodity, can make the difference between and enjoyable lighting experience or a real pain when they either don't provide enough light, throw out the wrong light in the wrong directions, or at worst, keep blowing.
Possible Types of Bulb for Wall and Ceiling Lighting
Fluorescent Bulbs
Available in a range of sizes and even in circular form, fluorescent lights are highly energy efficient and can be used with mains voltage fittings.
They are ideal for wall lights in their mini tube form and even in bulb form. These bulbs, or florescent lamps, are known as Compact Fluorescent Lamps or CFLs. They look just like ordinary lamps with the advantage, as said before, of being very energy efficient.
A disadvantage to fluorescent bulbs or lamps is that they cannot be used with dimmers.
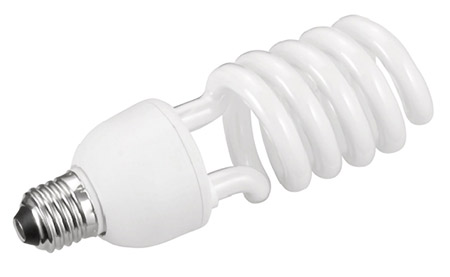
A typical CFL or fluorescent light bulb
Tungsten Bulbs
Tungsten bulbs, so called because the filament within them is made of tungsten, are the bulbs that most of us use every day around the house. The cheaper ones have a habit of blowing for a pastime as you will see from our project on blowing light bulbs.
They come in a number of forms and various wattages and offer a warm, slightly yellow/orange light. They can be bought with a bayonet fitting (BC fitting) or for smaller table lamps and some wall lights, a small bayonet fitting (SBC).
Edison Screw fittings or caps are now very popular and tungsten bulbs can be bought with the large Edoson screw fitting (ES or E27) or the smaller sized thread (SES or E14).
They can be bought as clear bulbs, pearl bulbs, coloured bulbs and some have a small silver tip which is ideal for use as a spotlight.
They also come in simple bulb shape or tear shape (usually used for lamps and chandeliers) with some varieties being small or large globe shaped bulbs. They are cheap and widely available but prone to blowing especially when switched on and off regularly.
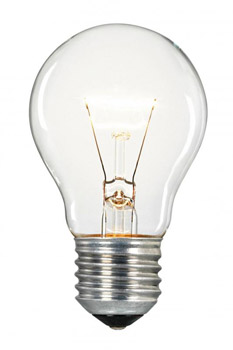
A common Tungsten bulb – Image courtesy of wisegeek.com
Halogen Bulbs
Halogen bulbs burn very brightly because they burn at a higher heat than tungsten bulbs. This means they use quartz as the actual bulb instead of glass as glass could not deal with the high temperatures halogen bulb filaments emit.
They are available in 12V form where a transformer will be needed to bring the voltage down from 240 volts. The low voltage (LV) halogen lamps are often used in the bathrooms, kitchens and other smaller rooms where a low voltage, but bright light is required.
They are energy efficient but quite expensive and ideal for wall lights where facilitating reading is the main function of the light.
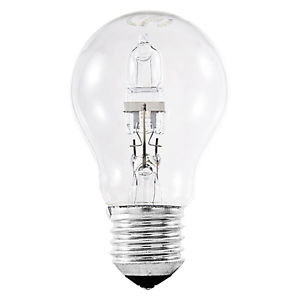
A common Halogen Bulb
First Steps For Adding Wall Lights To Existing Circuits
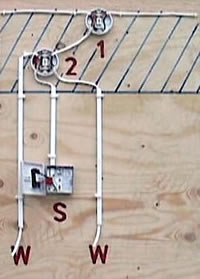
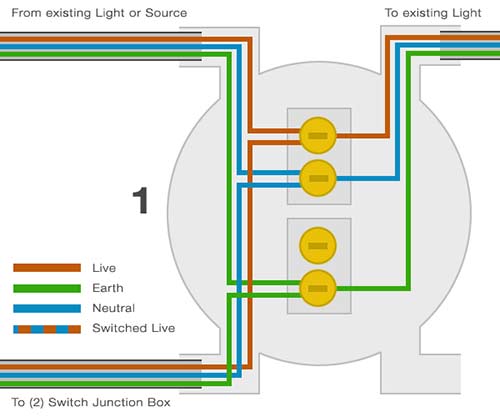
Diagram for the circuit required for independently switched wall lights
The above image correlates to the items listed below:
- 1 = Junction box cutting into existing main lighting cable
- 2 = Switch junction box connecting both wall lights to mains power and switch
- S = Switch and switch back-box
- W = Wall lights
Marking the Position of your Wall Lights
Do not cut or remove any cables or wires without first turning your power off and removing the fuse from the circuit you are working on. If working with "trip switches" (please see our electrical safety project) put a large note on the consumer unit stating not to turn tihs circuit back on. You may have turned the power off and be in the loft, when an unknowing family member thinks the lights have tripped and flicks the switch!)
Think carefully about the position of your new light's and mark the wall, make your holes and chases, and all new connections before making the final connections to the existing circuit. That way you can keep the lights on as long as possible.
Finding an Existing Lighting Cable
Trace a lighting cable from the light point nearest to the position of your new light or lights (do not disconnect or cut anything yet). You need a cable that does not go to a switch.
Make sure you have enough slack on your chosen cable to insert a junction box and be able to fix it securely to a joist or rafter. You may have to insert a timber "noggin" to achieve this fixing.
You need to work out where this position is, in relation to the position you will install your new cables according to the circuit you choose.
For this example you will need to mark the wall for your switch, and both wall lights. Make a hole large enough in the wall to accept the switch or pattress box.
Making Wall Chases for Lighting Cable
Chase a slot in the wall wide enough to accept your cable and its conduit container. Take this chase up the wall to the ceiling and make a hole in the ceiling at the back of the chase. (when the chase is filled you will not see the hole).
Make the same chase and hole for the wires to the wall lights.
Take out a "blanking piece" from the pattress box and insert a rubber grommet to stop the cable chafing on the metal housing of the pattress box.
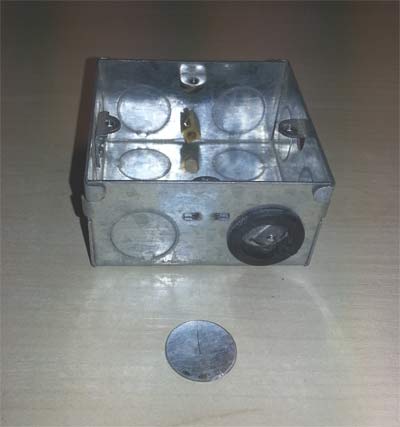
Pattress box with rubber grommet
Fitting a Patress Box to the Wall
Connect the box securely to the wall using the holes provided. Take a length of 1.5mm cable and run it from the cable you have identified earlier, through the hole in the ceiling and down to the switch and both wall lights. Allow sufficient cable for your connections at each end.
Stripping and Connecting Cables
Thread the lower end of these cables into suitable conduit, so the top end of the conduit just goes through your ceiling or floor and the bottom end finishes at the end of the chase.
Fix this conduit to the back of the chase. We have used cable clips in this diagram, but you could use anything that will not rust to hold them in place until you have plastered.
Now strip the switch wires, connecting the earth to the earthing point in the pattress box, the red to the top terminal of the switch, and the black, after applying a piece of red tape, to the bottom terminal. Screw the switch plate on to the pattress box, fixing it in place.
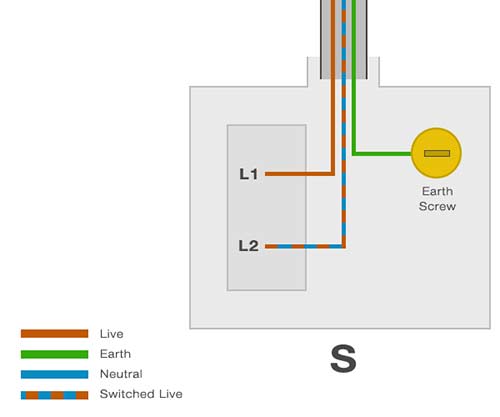
Inside of switch box showing wiring to switch
Once the switch has been connected up it's now time to connect your wall lights using the manufacturers instructions included with the lights themselves.
Connection of Wall Lights
Now we will be working on the level above, if you are in the loft, rig yourself up a suitable lead light which you will be able to plug into an ordinary socket. This will still work when you switch off the lighting circuit. Alternatively, you can also use a head torch as this will provide adequate light but also free up your hands for working.
It is as well to do this now to avoid too many trips up and down. Turn off the power and remove the fuse.
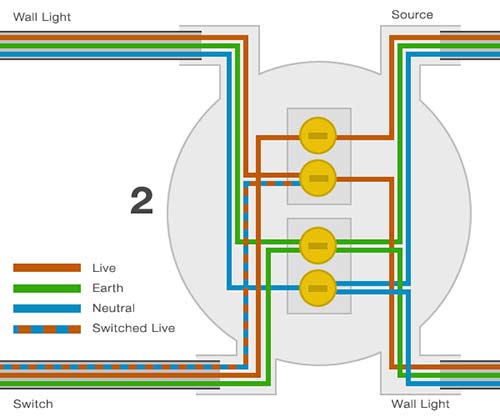
Switch junction box showing wiring from source to switch
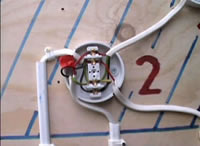
Switch junction box showing wiring with junction box
Connecting wall lights to mains
Strip the ends of both wall light cables and fix them into a 4 terminal, 15amp junction box. Leave an end terminal free and join both lives (red) in the other end terminal, then both earths, then both neutrals (black). The earth wire will need a small piece of earth sleeving over it. Fix this junction box securely to a joist or rafter.
Take a length of cable and strip the wires from both ends, join the red (live) to the spare terminal you have left in the first junction box. The earth and neutral go to join the other earths and neutrals in that same box. The other end of this cable will go to the existing circuit in a moment. Now take the end of the switch wire and strip.
Join the red to the single red in what was the spare terminal, and the black (after applying a piece of red tape), to the other reds from your wall lights. This of course means that both the black and red wires to the switch are live, and you have interrupted the live flow with the switch, which when on, will complete the circuit.
The top right cable is the one which will go to the existing. Top left is a wall light cable. Bottom left goes to the switch. Bottom right to the second wall light.
Now its time to connect up! Make absolutely sure your lighting circuit is dead and cut the cable you first identified.
Strip the ends of all the wires, apply earthing sleeves and join them up again in the junction box, while at the same time including the wires from the cable in between the two junction boxes. Red to red, black to black and earth to earth.
Keep the earth wires in one of the middle terminals and the red and black as far apart as possible in the far two terminals.
Mains junction box wiring
Top cables are existing, cut and joined. Bottom cable goes to second junction box. Your complete circuit should look like this…only a bit more spread out!
Completed switch circuit with additional light added
In the image above, the blue shaded area is your loft, or floor void, W = wall-lights and S = switch.
Now run through each connection, check it, fit the covers on junction boxes, insert the fuse and switch on. If all is well and good, your lighting should be up and running.
Once you have tested and confirmed that all is working as it should, turn off and isolate the circuit again so that you can now fill and/or plaster your chase.
Making Good and Finishing Chases in Walls and Ceiling
Ideally you should complete the plaster-work before making a live connection, and certainly make sure it is dry before you do go live but as said above, it's a good idea to check everything is working then turn it all off again to do the plasterwork waiting until dry to turn on again.
If you find that you have a defect in the cable that you have just plastered over, it's infinitely easier to replace the cable while it is uncovered, rather than try to pull new cables through.
It is also a good point to note that the right tools for any electrical or for that matter, DIY work can save time and keep you safe. A stud, pipe and electrical current detector is essential if you need to drill into any wall or surface as this handy little tool can detect these items hiding in your walls.
In terms of drilling it is also good to have a decent selection of either flat bits or hybrid bits to hand (for more information on flat drill bits see our tool review and also see our hybrid bits tool review).
For regulations governing the heights of a socket or switch on a wall, please see our socket height regulations project here.
All project content written and produced by , founder of DIY Doctor and industry expert in building technology.
how to add a neutral wire to an existing light switch
Source: https://www.diydoctor.org.uk/projects/projectselectrical.htm
Posted by: treatsmandertne.blogspot.com
0 Response to "how to add a neutral wire to an existing light switch"
Post a Comment